Configuring
Suggest editsImplementing Esri ArcGIS Pro and Esri ArcGIS Enterprise with EDB Postgres Advanced Server requires the following components:
- A running EDB Postgres Advanced Server instance
- PostGIS version 3.2 or later, installed on EDB Postgres Advanced Server
- Your GIS data
- A running Esri ArcGIS Pro instance
- Optionally, a running Esri ArcGIS Enterprise configuration for data and map sharing
Configuring EDB Postgres Advanced Server and PostGIS
You can configure PostGIS on your EDB Postgres Advanced Server instance and set up the appropriate users and extensions needed for PostGIS to work with Esri ArcGIS Pro and Esri ArcGIS Enterprise.
Prerequisites
You need these components before integrating EDB Postgres Advanced Server with Esri ArcGIS Pro and Esri ArcGIS Enterprise:
- A running instance of EDB Postgres Advanced Server
- PostGIS version 3.2 or later, installed on your EDB Postgres Advanced Server instance
You must create a gisadmin user, which is an administrator read/write user with superuser privileges. You must also install a PostGIS database and all of the extensions needed for PostGIS to operate correctly. We recommend then entering some data to ensure PostGIS is working and that you can view data with geometry data types.
- Create a gisadmin user:
c:\Program Files\edb\as14\bin>psql.exe -p 5444 -d edb -U enterprisedb
psql (14.4.0)
WARNING: Console code page (437) differs from Windows code page (1252)
         8-bit characters might not work correctly. See psql reference
         page "Notes for Windows users" for details.
Type "help" for help.

edb=#
edb=# CREATE ROLE gisadmin LOGIN PASSWORD 'Fusion123' SUPERUSER;
CREATE ROLE
edb=#
edb=# exit
- Log in as the new gisadmin user:
c:\Program Files\edb\as14\bin>
c:\Program Files\edb\as14\bin>psql.exe -p 5444 -d edb -U gisadmin
psql (14.4.0)
WARNING: Console code page (437) differs from Windows code page (1252)
         8-bit characters might not work correctly. See psql reference
         page "Notes for Windows users" for details.
Type "help" for help.
- Create a
postgisdatabase and connect to it:
edb=#
edb=# CREATE DATABASE postgis;
CREATE DATABASE
edb=#
edb=# \c postgis
You are now connected to database "postgis" as user "gisadmin".
postgis=#
- Create all of the PostGIS extensions:
postgis=#
postgis=# CREATE EXTENSION postgis;
CREATE EXTENSION
postgis=# CREATE EXTENSION postgis_topology;
CREATE EXTENSION
postgis=# CREATE EXTENSION fuzzystrmatch;
CREATE EXTENSION
postgis=# CREATE EXTENSION address_standardizer;
CREATE EXTENSION
postgis=# CREATE EXTENSION address_standardizer_data_us;
CREATE EXTENSION
postgis=# CREATE EXTENSION postgis_tiger_geocoder;
CREATE EXTENSION
postgis=# CREATE EXTENSION postgis_sfcgal;
ERROR:  could not open extension control file "C:/Program Files/edb/as14/share/extension/postgis_sfcgal.control": No such file or directory                  —THIS WILL NOT WORK WITH 2.* and above versions as per docs
postgis=# CREATE EXTENSION postgis_raster;
CREATE EXTENSION
postgis=#
- Create a table to test that PostGIS is working properly:
postgis=#

postgis=# CREATE  TABLE roads ( ID int4, NAME varchar(128) );
CREATE TABLE
postgis=# SELECT AddGeometryColumn( 'roads', 'geom', -1, 'GEOMETRY', 2 );
NOTICE:  SRID value -1 converted to the officially unknown SRID value 0
               addgeometrycolumn
------------------------------------------------
 public.roads.geom SRID:0 TYPE:GEOMETRY DIMS:2
(1 row)
- Insert some data into the table that you created:
postgis=# INSERT INTO ROADS (ID,GEOM,NAME ) VALUES (1,ST_GeomFromText('LINESTRING(0 10,0 0)',-1),'Beacon Road');
NOTICE:  SRID value -1 converted to the officially unknown SRID value 0
INSERT 0 1
postgis=# INSERT INTO ROADS (ID,GEOM,NAME ) VALUES (2,ST_GeomFromText('LINESTRING(0 0,0 10)',-1),'Violet Road');
NOTICE:  SRID value -1 converted to the officially unknown SRID value 0
INSERT 0 1
postgis=# INSERT INTO ROADS (ID,GEOM,NAME ) VALUES (3,ST_GeomFromText('LINESTRING(0 0,10 0)',-1),'Skelton Street');
NOTICE:  SRID value -1 converted to the officially unknown SRID value 0
INSERT 0 1
postgis=# INSERT INTO ROADS (ID,GEOM,NAME ) VALUES (4,ST_GeomFromText('LINESTRING(0 0,10 10)',-1),'Fifth Avenue');
NOTICE:  SRID value -1 converted to the officially unknown SRID value 0
INSERT 0 1
postgis=# INSERT INTO ROADS (ID,GEOM,NAME ) VALUES (5,ST_GeomFromText('LINESTRING(0 10,0 0)',-1),'Main Street');
NOTICE:  SRID value -1 converted to the officially unknown SRID value 0
INSERT 0 1
postgis=# INSERT INTO ROADS (ID,GEOM,NAME ) VALUES (6,ST_GeomFromText('LINESTRING(10 0,0 0)',-1),'Lipton Street');
NOTICE:  SRID value -1 converted to the officially unknown SRID value 0
INSERT 0 1
postgis=#
- Show the data that was added in table format:
postgis=#
postgis=# SELECT id, ST_AsText(geom) AS geom, name FROM ROADS order by id;
 id |         geom          |      name
----+-----------------------+----------------
  1 | LINESTRING(0 10,0 0)  | Beacon Road
  2 | LINESTRING(0 0,0 10)  | Violet Road
  3 | LINESTRING(0 0,10 0)  | Skelton Street
  4 | LINESTRING(0 0,10 10) | Fifth Avenue
  5 | LINESTRING(0 10,0 0)  | Main Street
  6 | LINESTRING(10 0,0 0)  | Lipton Street
(6 rows)

postgis=#
- Show the PostGIS version:
postgis=# SELECT PostGIS_Version();
            postgis_version
---------------------------------------
 3.2 USE_GEOS=1 USE_PROJ=1 USE_STATS=1
(1 row)
Configuring ArcGIS Pro with EDB Postgres Advanced Server
After you configure PostGIS with your EDB Postgres Advanced Server instance and ensure that PostGIS is configured correctly, your database is ready to interact with Esri ArcGIS Pro as you create an enterprise geodatabase.
GIS data
You can create your own GIS datasets or download GIS data.
These test cases are using the sample HongKong GDB data file, which you can find here.
Enable environment to create an enterprise geodatabase
Generate an authorization file for Esri ArcGIS Server license to generate a keycodes file for your enterprise geodatabase according to the ArcGIS documentation.
Verify that you have the authorization file, which is typically located in
C:\Program Files (x86)\Common Files\ArcGIS\bin.To run the authorization wizard to start generating your keycodes file, double-click
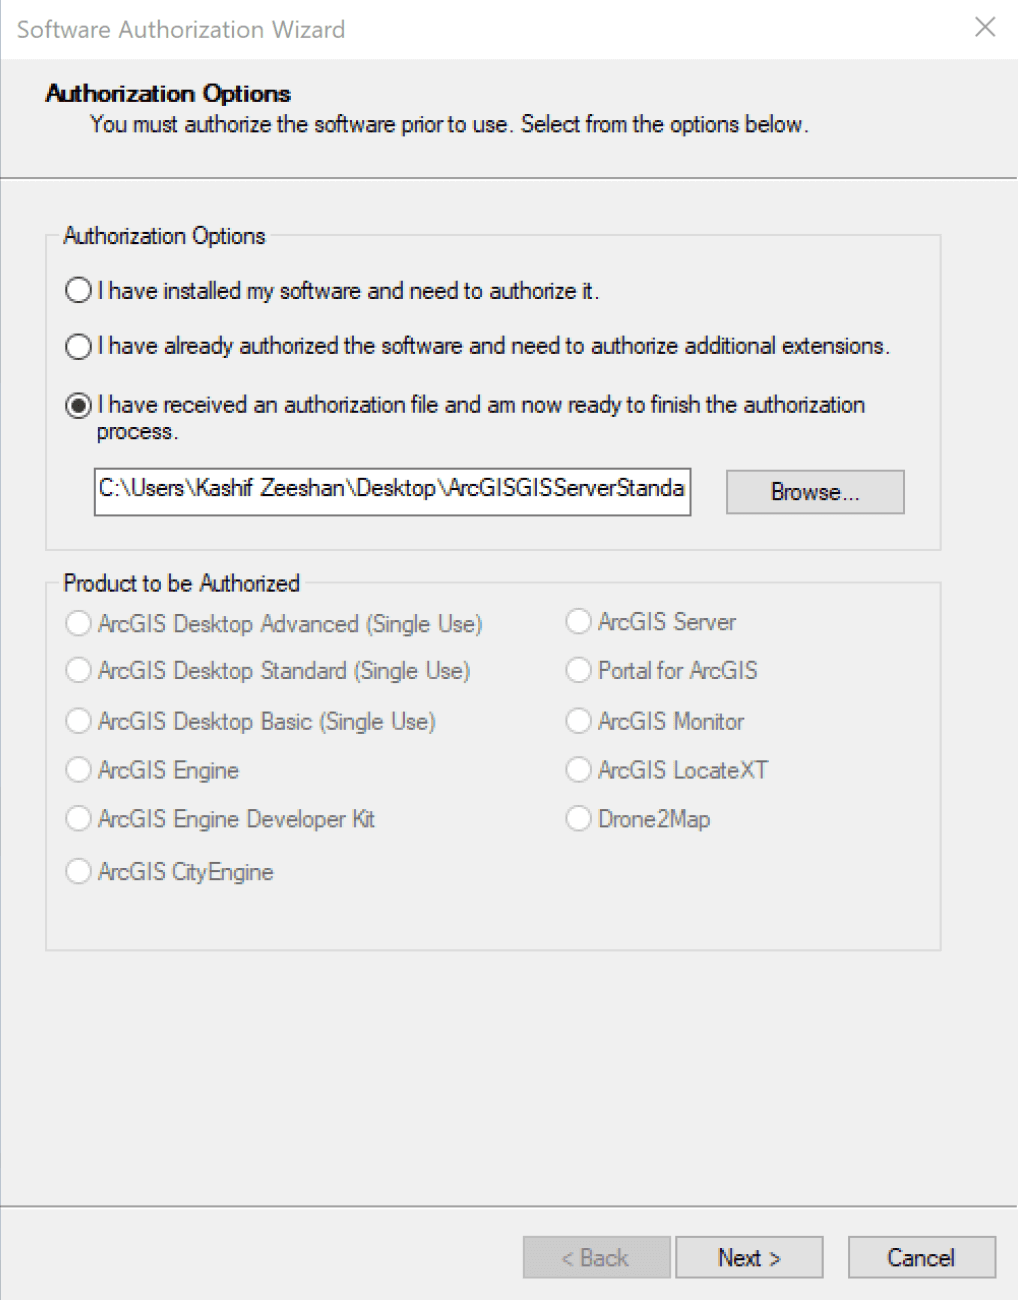
SoftwareAuthorization.exe.In the Software Authorization wizard, under Authorization Options, select I have received an authorization file and am now ready to finish the authorization process.

Select Browse to select the
.ecpauthorization file obtained in step 1.For Product to be Authorized, make sure ArcGIS Server is selected, and then select Next.
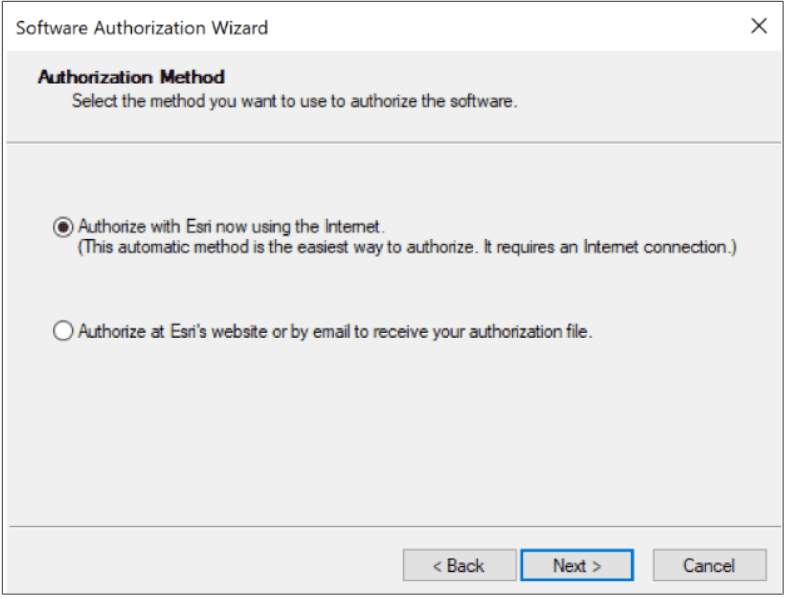
On the Authorization Method page, accept the default option, Authorize with Esri now using the Internet, and select
Next.
On the Authorization Information page, confirm that your contact information is correct, and then select Next.
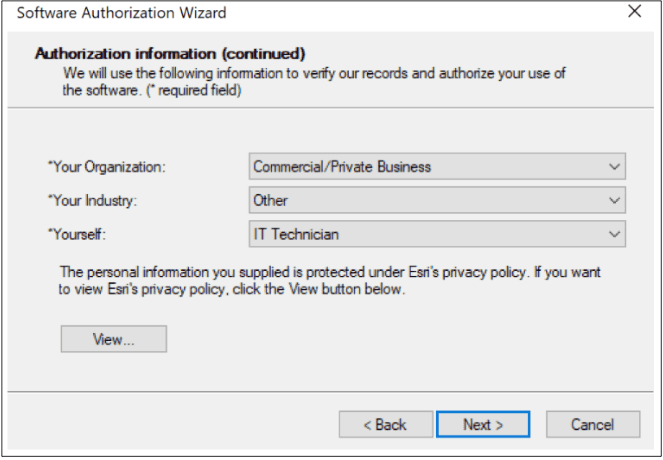
On the Authorization Information (continued) page, enter your industry information, confirm your selections, and then select Next.

On the Software Authorization Number screen, enter your license number, and then select Next.
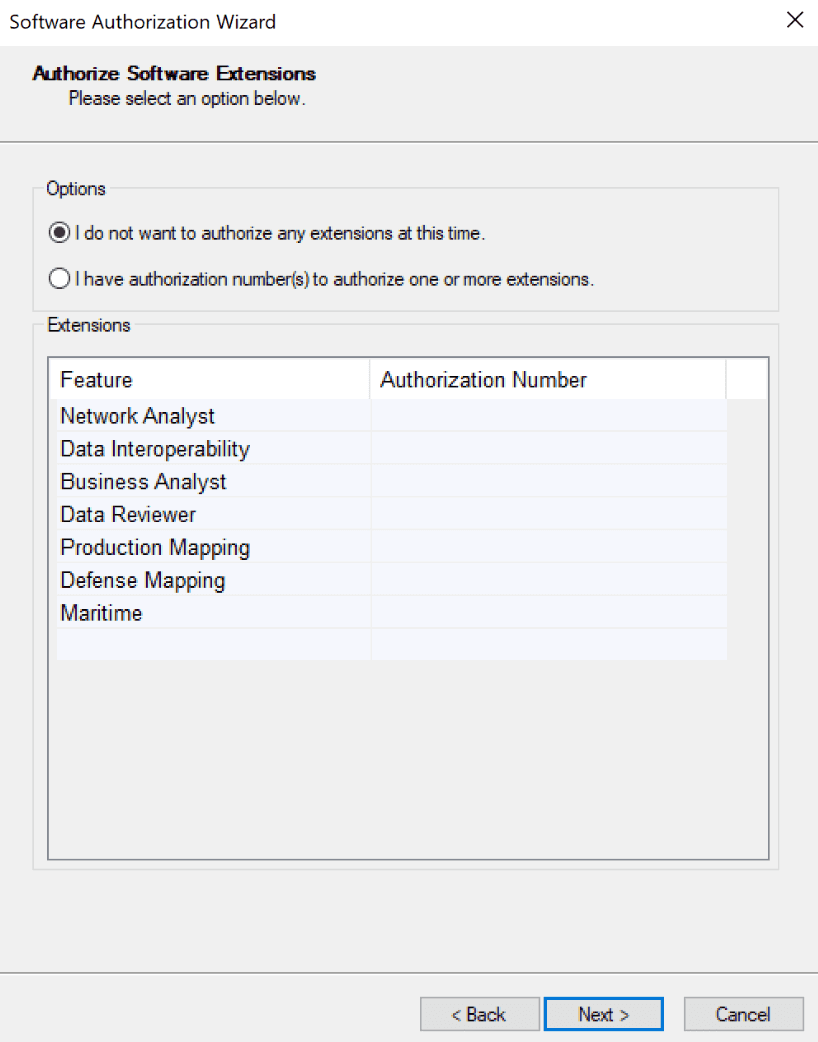
If you don't want any extensions, on the Authorize Software Extensions page, select the default option, I do not want to authorize any extensions at this time. Select Next.

The authorization process starts. When it finishes, a message reports that the software has been authorized.
After your license is successfully authorized, select Finish. Your keycodes file is created.
Navigate to the following location to verify the newly created keycodes file is present:
C:\Program Files(x86)\Esri\License10.x\sysgen.This keycodes file is used when you create an enterprise geodatabase.
Configuring an Esri ArcGIS Enterprise environment
If you need an Esri ArcGIS Enterprise environment, you must configure and run it. For instructions see this ArcGIS Enterprise tutorial.
Esri ArcGIS Pro configuration for enterprise sharing
Before you can share from your Esri ArcGIS Pro environment to an Enterprise portal that you created, you need to add that portal in your Esri ArcGIS Pro environment.
- In ArcGIS Pro, select Projects > Portals.
- To add the URL of the portal you want to use, select Add Portal.
- Set the portal as the active portal by selecting the option from the ... menu to the right.
- Right-click the portal name, and then select Sign in.
After you sign in to your Esri ArcGIS Enterprise portal, you're ready to share to an Esri ArcGIS Enterprise environment.
Could this page be better? Report a problem or suggest an addition!